

버니케어 프로젝트에서 회원가입 및 회원탈퇴를 즉각적으로 알기 위한 요구사항이 생겼고, 이를 위해 간단하고 비용이 들지 않는 텔레그램을 통해 기능 구현한 과정을 설명드리겠습니다.
구현 순서는 아래와 같습니다.
- 텔레그램 봇 생성
- 채팅방 생성 및 관리자 권한 설정
- 채팅방의 ID 알아내기
- PostMan으로 채팅방에 채팅 보내기
- 텔레그램 API를 통해 Spring 에서 Post 요청 보내기
1. 텔레그램 봇 생성
먼저 테스크탑에 텔레그램을 설치해야 합니다. 설치 후 BotFather 검색 후 체크표시가 있는 챗을 선택 후 시작을 누릅니다.
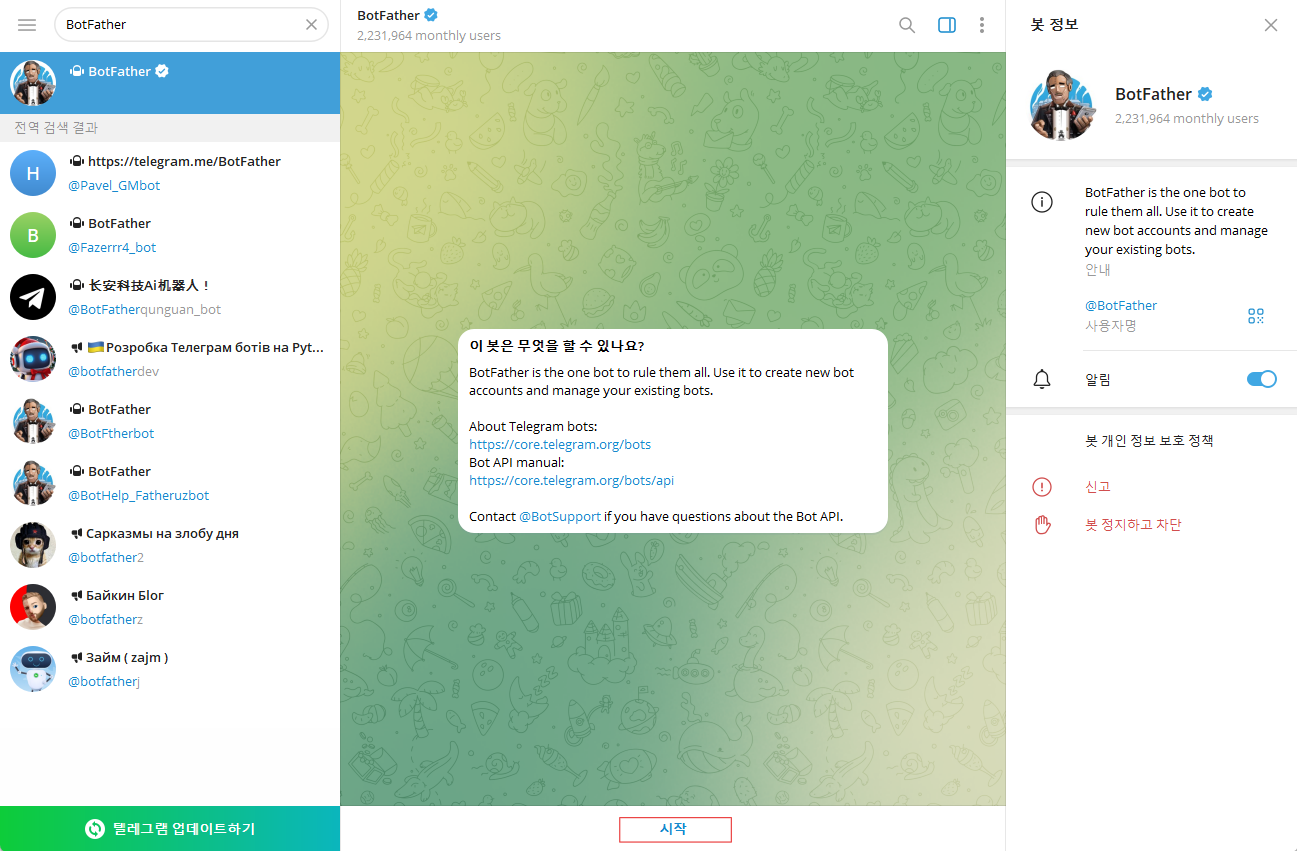
/newbot 명령어를 통해 봇의 이름을 생성할 수 있습니다.

봇의 이름은 중복을 허용하지 않고 반드시 뒤에 _bot으로 끝나야 합니다.

중복되지 않은 이름을 정하면 다음과 같이 토큰과 API문서를 응답해줍니다.
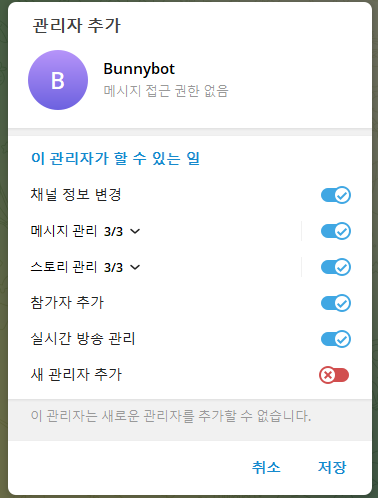
2. 채팅방 생성 및 관리자 권한 설정
특정 채팅방에서 봇이 채팅 관련 기능을 하기 위해서 관리자로 등록해야합니다.
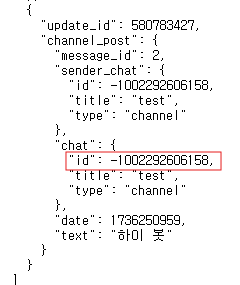
3. 참가한 채팅 ID 알아내기
봇을 통해 채팅방에 채팅기능을 하기 위해서는 우선 채팅방의 고유 ID 를 알아야합니다. 고유 ID를 알아내기 위해 봇이 참가한 채팅방에 메시지 하나 입력 후 아래 API로 GET 요청 보내면 메시지를 보내 채팅방의 ID를 알아낼 수 있습니다.
https://api.telegram.org/bot{{token}}/getUpdates
4. PostMan으로 메시지 보내기
메시지는 아래의 API를 통해 보낼수 있습니다. RequestBody에 chat_id, text를 입력해야 합니다.
https://api.telegram.org/bot{{token}}/sendMessage

5. 텔레그램 API를 통해 Spring에서 메시지 보내기
WebClient를 이용해 api 호출이 성능에 영향을 주지 않기 위해 NonBlocking 방식으로 호출할 예정이다.
WebClientConfig.java
@Configuration
public class WebClientConfig {

    @Value("${telegram.token}")
    private String telegramToken;

    @Bean
    public WebClient telegramWebClient() {
        return WebClient.builder()
                .baseUrl("https://api.telegram.org/bot" + telegramToken)
                .build();
    }
}
TelegramNotificationService.java
@Slf4j
@Service
@RequiredArgsConstructor
public class TelegramNotificationService {

    private final WebClient webClient;

    @Value("${telegram.chat-id}")
    private String telegramChatId;

    @Value("${telegram.info-chat-id}")
    private String infoChatId;

    @Async
    public void sendRegisterMessage(UserEntity user){
        // JSON 데이터 생성
        String message = String.format(
                "*회원가입 성공 알림*\n\n- 이름: %s\n- 이메일: %s\n- 소셜 타입: %s",
                user.getName(), user.getEmail(), user.getSocialType().getValue()
        );
        Map<String, String> requestBody = Map.of(
                "chat_id", telegramChatId,
                "text", message
        );

        webClient.post()
                .uri("/sendMessage")
                .bodyValue(requestBody)
                .retrieve()
                .bodyToMono(String.class) // 응답 처리
                .doOnError(e -> log.error("Failed to send Telegram message: {}", e.getMessage()))
                .subscribe();
    }
}